server.js

// 설치한 라이브러리를 가져온다
const express = require('express');
const app = express();      // 기본적으로 express를 사용할 수 있는 변수를 생성

// express포트 설정
const PORT = process.env.PORT || 5000;


const bodyParser = require('body-parser');
const cors = require('cors');

// config body-parser
app.use(bodyParser.json());
app.use(cors());

// mysql 데이터베이스 사용
const mysql = require('mysql');

// db 접속 정보 
const db = mysql.createConnection({
    host: "127.0.0.1",
    user: "user_icia",
    password: "1111",
    port: "3306",
    database: "db_icia"
});

//db접속
db.connect((err)=>{
    if(!err){
        console.log('db접속 성공!');
    } else {
        console.log('db접속 실패!');
    }
});

// 서버 접속
app.listen(PORT, () => {
    console.log(`Server On : http://localhost:${PORT}`);
});

// 처음 express에 접속 했을 경우
app.get('/', (req, res) => {
    console.log('root!');
});


// 게시글 목록 불러오기
app.get('/list', (req, res) => {
    console.log(`app.get('/list')`);
    
    const sql = "select * from board order by id desc";
    db.query(sql, (err, data) => {
        if(!err){
            // console.log(data);
            res.send(data);
        } else {
            console.log(err);
        }
    });
});

// 게시글 상세보기
app.get('/view/:id', (req, res) => {
    const id = req.params.id;
    console.log(`app.get('/view/${id}')`);


    const sql = "select * from board where id=?";
    db.query(sql, [id], function(err, data) {
        if(!err){
            console.log(data);
            res.send(data);
        } else {
            console.log(err);
        }
    });
});


//게시글 등록
app.post('/insert', function(req, res) {
    const title=req.body.title;
    const contents=req.body.contents;
    const writer=req.body.writer;

    console.log(title, contents, writer);

    const sql='insert into board(title, contents, writer) values(?,?,?)';

    db.query(sql, [title, contents, writer], function(err, data){
        if(!err){
            console.log(data);
            res.sendStatus(200);
        } else {
            console.log(err);
        }
        
    });
});

//게시글 수정
app.post("/update/:id", function(req, res) {
    console.log(`수정 확인!`);

    const id = req.params.id;
    const title=req.body.title;
    const contents=req.body.contents;
    const writer=req.body.writer;

    console.log(id, title, contents, writer);

    const sql='update board set title=?, contents=?, writer=? where id=?';

    db.query(sql, [title, contents, writer, id], function(err, data){
        if(!err){
            console.log(data);
            res.sendStatus(200);
        } else {
            console.log(err);
        }
    });
});

// 게시글 삭제
app.post('/delete/:id', (req, res) => {
    
});


App.js

import './App.css';
import 'bootstrap/dist/css/bootstrap.min.css';
import BoardMain from './component/BoardMain';

function App() {

  return (
    <div className="App">
      <BoardMain />
    </div>
  );
}

export default App;

BoardMain.jsx

import { BrowserRouter, Routes, Route } from 'react-router-dom';
import BoardMain from './BoardMain';
import BoardWrite from './BoardWrite';
import BoardView from './BoardView';
import BoardList from './BoardList';
import BoardModify from './BoardModify';

const BoardMain = () => {

    return (
        <div id="board-main">
            <BrowserRouter>
                <Routes>
                    <Route path="/" element={<BoardList />} />
                    <Route path="/list" element={<BoardList />} />
                    <Route path="/write" element={<BoardWrite />} />
                    <Route path="/view/:id" element={<BoardView />} />
                    <Route path="/modify/:id" element={<BoardModify />} />
                </Routes>
            </BrowserRouter>
        </div>
    )
}

export default BoardMain;

BoardList.jsx

import { Table, Button} from 'react-bootstrap'
import { useEffect , useState } from 'react';
import axios from 'axios';
import {Link} from 'react-router-dom'

const BoardList = () => {

    const [boardList, setBoardList] = useState({});

    // hook의 일종
    // 마운트와 업데이트 사이
    // 컴포넌트가 랜더링 될 때 , 업데이트 될 때 실행
    
    const getBoardData = async () => {
        const boards = await axios('/list');
        console.log(boards);
        setBoardList(boards.data);
    }

    useEffect(() => {
        getBoardData()
    }, []); // 


    if(boardList.length>0){
        return(
            <div className='board-list'>
                <h1>게시글 목록</h1>

                <Table striped bordered hover>
                <thead>
                    <tr>
                        <th>번호</th>
                        <th>제목</th>
                        <th>작성자</th>
                        <th>작성일</th>
                    </tr>
                </thead>
                <tbody>
                        {boardList.map(boards=>(
                        <tr >
                            <td>{boards.id}</td>
                            <td><Link to={`/view/${boards.id}`}>{boards.title}</Link></td>
                            <td>{boards.writer}</td>
                            <td>{boards.reg_date}</td>
                        </tr>)
                        )}
                    </tbody>
                
            </Table>
            <Link to={`/write`} >
                    <Button className='mx-2 btnWrite'>작성하기</Button>
                </Link>
            </div>
                
           
        );
    }


}

export default BoardList;

BoardWrite.jsx

import axios from 'axios';
import React, { useState } from 'react'
import { Row, Col, Form, Button } from 'react-bootstrap'


const BoardWrite = () => {

    const [form, setForm] = useState({
        title: '',
        contents: '',
        writer: ''
    });

    const { title, contents, writer } = form;

    const onChange = (e) => {
        setForm({
            ...form, 
            [e.target.name] : e.target.value
        })
    }

    const onSubmit = async () => {
        if (title === '') {
            alert('제목을 입력하세요!');
        } else if (contents === '') {
            alert('내용을 입력하세요!');
        } else {
            if (window.confirm('게시글을 등록하시겠습니까?')) {
                await axios.post('/insert', form);
                window.location.href = "/list";
            }
        }
    }

    const onReset = () => {
        setForm({
            ...form,
            title: '',
            contents: '',
            writer: ''
        });
    }

    return (
        <Row className='my-5'>
            <Col className='p-5'>
                <h1 className='text-center my-5'>게시글 작성</h1>
                <Form>
                    <h4>제목</h4><Form.Control placeholder='제목을 입력하세요.'
                        className='my-3' name='title' value={title} onChange={onChange} />

                    <h4>작성자</h4><Form.Control placeholder='작성자를 입력하세요.'
                        className='my-3' name='writer' value={writer} onChange={onChange} />

                    <h4>내용</h4><Form.Control as='textarea' rows={10} placeholder='내용을 입력하세요.'
                        className='my-3' name='contents' value={contents} onChange={onChange} />

                    <div className='text-center'>
                        <Button className='mx-2 px-3 btn-sm' onClick={onSubmit}>저장</Button>
                        <Button className='mx-2 px-3 btn-sm' onClick={onReset} variant='secondary'>초기화</Button>
                    </div>
                </Form>
            </Col>
        </Row>
    )
}

export default BoardWrite;​


BoardView.jsx

import React, { useEffect, useState } from 'react';
import { useParams , Link  } from 'react-router-dom';
import axios from 'axios';
import {Row, Col, Button, Card} from 'react-bootstrap'


const BoardView = () => {

    const { id } = useParams(); // /board/:id와 동일한 변수명으로 데이터를 꺼낼 수 있습니다.
    const [board, setBoard] = useState({});

    const getBoard = async () => {
        const board = await axios.get(`/view/${id}`);
        console.log(`/view/${id}`);
        setBoard(board.data[0]);
    }

    useEffect(() => {
        getBoard();
    },[]);

    const onDelete = async() => {
        if(window.confirm(id + '번 게시글을 삭제하시겠습니까?')) {
            
        }
    }

    return (
        
        <div className="board-view">
            <Row className='my-5'>
            <Col className='px-5'>
                <h1 className='my-5 text-center'>{board.id}번 게시글 정보</h1>
                <div className='text-end my-2'>
                    <Link to={`/modify/${id}`}>
                        <Button className='btn-sm mx-2'>수정</Button>
                    </Link>
                    <Button className='btn-sm' variant='danger'
                        onClick={onDelete}>삭제</Button>
                </div>
                <Card>
                    <Card.Body>
                        <h5>[{board.id}] {board.title}</h5>
                        <hr/>
                        <div className='cArea'>{board.contents}</div>
                    </Card.Body>
                    <Card.Footer>
                        Created on {board.reg_date} by {board.writer}
                    </Card.Footer>
                </Card>
            </Col>
        </Row>
        </div>
    );
};

export default BoardView;

BoardModify.jsx

import React, { useEffect, useState } from 'react';
import { useParams } from 'react-router-dom';
import axios from 'axios';
import { Row, Col, Form, Button } from 'react-bootstrap'


const BoardModify = () => {

    const { id } = useParams();

    const [board, setBoard] = useState({});
    const getBoard = async () => {
        const board = await (await axios.get(`/view/${id}`));
        setBoard(board.data[0]);
    };
    useEffect(() => {
        getBoard();
    },[]);
    
    
    const [form, setForm] = useState({
        title: '',
        contents: '',
        writer: ''
    });

    const { title, contents, writer } = form;

    const onChange = (e) => {
        setForm({
            ...form,
            [e.target.name]: e.target.value
        })
    }

    const onReset = () => {
        setForm({
            ...form,
            title: '',
            contents: '',
            writer: ''
        });
    }

    const onSubmit = async () => {
        if (title === '') {
            alert('제목을 입력하세요!');
        } else if (contents === '') {
            alert('내용을 입력하세요!');
        } else {
            if (window.confirm('게시글을 수정하시겠습니까?')) {
                await axios.post(`/update/${id}`, form);
                window.location.href = "/list";
            }
        }
    }


    return (
        <Row className='my-5'>
            <Col className='p-5'>
                <h1 className='text-center my-5'>게시글 수정</h1>
                <Form>
                    <h4>제목</h4> <Form.Control placeholder={board.title}
                        className='my-3' name='title' value={title} onChange={onChange} />

                    <h4>작성자</h4><Form.Control placeholder={board.writer}
                        className='my-3' name='writer' value={writer} onChange={onChange} />

                    <h4>내용</h4><Form.Control as='textarea' rows={10} placeholder={board.contents}
                        className='my-3' name='contents' value={contents} onChange={onChange} />
                    <div className='text-center'>
                        <Button className='mx-2 px-3 btn-sm'
                            onClick={onSubmit}>저장</Button>
                        <Button className='mx-2 px-3 btn-sm'
                            onClick={onReset} variant='secondary'>초기화</Button>
                    </div>
                </Form>
            </Col>
        </Row>
    );
};

export default BoardModify;​


package.json

{
  "name": "board-test",
  "version": "0.1.0",
  "private": true,
  "proxy": "http://localhost:5000/",
  "dependencies": {
    "@testing-library/jest-dom": "^5.17.0",
    "@testing-library/react": "^13.4.0",
    "@testing-library/user-event": "^13.5.0",

    "axios": "^1.5.1",
    "body-parser": "^1.20.2",
    "bootstrap": "^5.3.2",
    "cors": "^2.8.5",
    "express": "^4.18.2",
    "json": "^11.0.0",
    "mysql": "^2.18.1",
    "nodemon": "^3.0.1",
    "react": "^18.2.0",
    "react-bootstrap": "^2.9.0",
    "react-dom": "^18.2.0",
    "react-router-dom": "^6.16.0",
    "react-scripts": "5.0.1",
    "web-vitals": "^2.1.4"
  },
  "scripts": {
    "start": "react-scripts start",
    "build": "react-scripts build",
    "test": "react-scripts test",
    "eject": "react-scripts eject"
  },
  "eslintConfig": {
    "extends": [
      "react-app",
      "react-app/jest"
    ]
  },
  "browserslist": {
    "production": [
      ">0.2%",
      "not dead",
      "not op_mini all"
    ],
    "development": [
      "last 1 chrome version",
      "last 1 firefox version",
      "last 1 safari version"
    ]
  }
}

[0] 개발환경
 - nodejs 설치
 - VSCode 설치

[1] React 프로젝트 생성
 - npx create-react-app 'react-basic'

 - 안될 경우 
 - npm uninstall -g create-react-app
 - npm install -g create-react-app
 - npx create-react-app 'react-basic'

[2] 프로젝트 실행
 - npm start
 - localhost:3000
 - public/index.html의 (id="root")는
 - src/index.js의 document.getElementById('root')에 렌더링 한다. 
 - src/index.js의 <App />은 
 - src/App.js의 function App(){} (App 컴포넌트)의 return안에 있는 내용을 가져와서 출력한다.

[3] 프로젝트 구성 설명
 - node_modules : 라이브러리 폴더
 - public폴더
   └ index.html이 메인페이지 (App.js → index.js → index.html)
   └ static파일 보관함
 - src폴더 : 소스코드 보관함
 - package.json : 설치한 라이브러리 목록

[4] 컴포넌트 설명
 - 리액트(React) 컴포넌트는 React 애플리케이션을 구성하는 기본 단위(UI의 한부분)
 - 독립적이고 재사용 가능한 코드 블록
 - 자체적인 구조, 스타일, 동작
 - 큰 UI를 관리하기 쉬운 작은 단위로 분할하여, 애플리케이션의 코드를 더 효율적으로 관리하고 재사용

 - 클래스형과 함수형 컴포넌트가 있지만 최근에는 함수형을 사용한다.
 - 함수형 컴포넌트 snippet : "rsc" 자동완성

[5] 컴포넌트 활용 알아보기
  (1) App.js

import './App.css';
import Strat from './component/Start';


function App() {

  return (
    <div className="App">
      <Strat />
    </div>
  );
}

export default App;


  (2) Start.jsx

import React from 'react';

const Start = () => {

    // 해당 영역에서는 이와 같이 주석을 사용할 수 있습니다.
    const name = "도깨비";

    // JSX(JavaScriptXML) : 코드 간결, 가독성 좋음
    // JSX를 사용하는 주요 이유 중 하나는 JavaScript 함수 내에서 HTML과 유사한 문법을 사용할 수 있게 함으로써, 
    // 사용자 인터페이스(UI)를 더 직관적이고 선언적으로 구성

    const style = {
        color : "white",
        backgroundColor : "black",
        fontSize : "48px",
        fontWeight : "bold",
        padding : "16px"
    }

    return (
        <div className='start'>
            <h2>이 곳은 Start.jsx 영역입니다.</h2>
            <h2>Start.jsx 내용이 출력됩니다.</h2>

            {/* 주석은 아래와 같이 작성합니다. */}
            {/* {React.createElement('h2', null, `${name}님 반갑습니다.`)} */}
            <h2 style={style}>{name}님 반갑습니다.</h2>
        </div>
    );
};

export default Start;


[6] 리액트 레이아웃 + css 적용하기

import './App.css';
import Header from './component/Header';
import Home from './component/Home';
import Footer from './component/Footer';

function App() {

  return (
    <div className="App">
      <Header/>
      <Home/>
      <Footer/>
    </div>
  );
}

export default App;


import React from 'react';

const Header = () => {
    return (
        <div className='header'>
            Header.jsx
        </div>
    );
};

export default Header;
import React from 'react';

const Home = () => {
    return (
        <div className='home'>
            Home.jsx
        </div>
    );
};

export default Home;
import React from 'react';

const Header = () => {
    return (
        <div className='header'>
            Header.jsx
        </div>
    );
};

export default Header;
import React from 'react';

const Footer = () => {
    return (
        <div className='footer'>
            <h3>COPYRIGHT © 2024 BY ICIA ALL RIGHTS RESERVED.</h3>
            <h2>프로젝트 기반의 리액트 기초 보수교육</h2>
            <h4>한국기술교육대학교 능력개발교육원 & 인천일보아카데미</h4>
        </div>
    );
};

export default Footer;
* {
    margin: 0;
    text-align: center;
}

.header {
    background-color: lightpink;
    height: 100px;
}

.home {
    background-color: lightblue;
    height: 400px;
}

.footer {
    background-color: lightgreen;
    height: 150px;
}

✍ 리액트 공식 사이트 http://react.dev 에서 배우게 될 내용

  • components(컴포넌트) 생성과 중첩
  • 마크업 및 스타일 추가 방법
  • 데이터를 표시하는 방법
  • conditions(조건) 및 목록(lists) 렌더링 하는 방법
  • 이벤트 응답과 화면 업데이트 방법
  • 컴포넌트 간에 데이터를 공유하는 방법

📚 Creating and nesting components : 컴포넌트 생성과 중첩

 리액트 앱들은 컴포넌트들로 구성된다. 컴포넌트는 고유의 로직과 외관을 갖는 UI(사용자 인터페이스)의 일부이다.

컴포넌트는 버튼만큼 작을 수도 있고, 전체 페이지만큼 클 수도 있다.


리액트 컴포넌트는 마크업을 반환하는 자바스크립트 함수이다:

function MyButton() {
  return (
    <button>I'm a button</button>
  );
}

위 코드는 함수형 컴포넌트로 return안에 마크업 언어인 <button>태그를 MyButton 이라는 컴포넌트로 선언하였다.

export default function MyApp() {
  return (
    <div>
      <h1>Welcome to my app</h1>
      <MyButton />
    </div>
  );
}


컴포넌트를 만들 때는 대문자로 시작한다는 점을 주의한다. 그래야 해당요소가 리액트 컴포넌트라는 것을 알 수 있다.

리액트 컴포넌트는 첫글자를 대문자로, HTML태그는 소문자로 작성한다.


해당 요소들을 App.js에 작성해서 결과를 알아보도록 한다.

// App.js

function MyButton() {
  return (
    <button>
      I'm a button
    </button>
  );
}

export default function MyApp() {
  return (
    <div>
      <h1>Welcome to my app</h1>
      <MyButton />
    </div>
  );
}


실행 결과

Welcome to my app


export default 키워드는 파일의 메인 컴포넌트를 지정한다. 만약 자바스크립트 구문이 익숙하지 않다면, MDNjavascript.info 에서 참고자료를 확인한다.


📚 Writing markup with JSX : JSX로 마크업 쓰기

위에서 보신 마크업 구문은 JSX라고 한다. 선택 사항이지만 대부분의 리액트 프로젝트는 JSX를 사용한다. 로컬 개발에 권장하는 모든 도구는 JSX를 즉시 지원한다.


JSX는 HTML보다 더 엄격하다. <br />와 같은 단일 태그는 반드시 닫는 태그를 표시해줘야 한다. 또한 컴포넌트는 여러 개의 JSX 태그를 return할 수도 없다. 공유된 상위 태그를 <div>.../div> 또는 빈 태그 <>...</> 와 같이 묶어야 한다 :

function AboutPage() {
  return (
    <>
      <h1>About</h1>
      <p>Hello there.<br />How do you do?</p>
    </>
  );
}

JSX로 포팅할 HTML이 많다면 온라인 컨버터를 사용할 수 있다.

온라인 컨버터 사용 예시


📚 Adding styles : 스타일 추가하기

React에서 className으로 CSS의 class를 지정한다. HTML의 class속성과 동일하게 작동한다

<img className="avatar" />


리액트에서 className으로 선언한 요소에 스타일을 CSS파일에서 선언해보도록 하겠다.

/* CSS */
.avatar {
  border-radius: 50%;
}


리액트는 CSS 파일을 추가하는 방법을 규정하지 않는다. 가장 간단한 경우에는 HTML에 <link> 태그를 추가할 것이다. 빌드 도구나 프레임워크를 사용하는 경우, CSS 파일을 프로젝트에 추가하는 방법은 해당 문서를 참조하면 된다.

( 리액트 프로젝트의 App.css에 작성하거나 index.html에서 선언해주면 될거 같다.)


📚 Displaying data : 데이터 표시

JSX는 마크업을 JavaScript에 넣을 수 있게 해준다. { 중괄호 }를 사용하면 코드에서 변수를 추출하여 사용자에게 표시할 수 있다. 다음 user.name을 예로 들어보자 :

return (
  <h1>
    {user.name}
  </h1>
);


JSX 속성에서도 중괄호{ }를 사용하여 JavaScript로 "이스케이프(escape)"할 수 있지만 따옴표 대신 중괄호를 사용해야 한다. 예를 들어, className="avatar"는 "avatar" 문자열을 CSS 클래스로 전달하지만, src={user.imageUrl}는 JavaScript에서 user.imageUrl 변수 값을 읽어와 해당 값을 src 속성으로 전달한다.

return (
  <img
    className="avatar"
    src={user.imageUrl}
  />
);


JSX 중괄호 내에는 더 복잡한 표현식도 넣을 수 있다. 예를 들면, 문자열 연결을 할 수 있다:

// App.js

const user = {
  name: 'Hedy Lamarr',
  imageUrl: 'https://i.imgur.com/yXOvdOSs.jpg',
  imageSize: 90,
};

export default function Profile() {
  return (
    <>
      <h1>{user.name}</h1>
      <img
        className="avatar"
        src={user.imageUrl}
        alt={'Photo of ' + user.name}
        style={{
          width: user.imageSize,
          height: user.imageSize
        }}
      />
    </>
  );
}


실행 결과

Hedy Lamarr

Photo of Hedy Lamarr

위 예제에서, style={ { } }는 특별한 문법이 아니라, style={ } JSX 중괄호 내의 일반적인 { } 객체다. style 속성은 스타일이 JavaScript 변수에 의존할 때 사용할 수 있다.


📚 Conditional rendering : 조건부 렌더링

React에서는 조건을 작성하는 데 특별한 문법이 없다. 대신, 일반적인 JavaScript 코드를 작성할 때 사용하는 기술을 그대로 사용한다. 예를 들어, JSX를 조건에 따라 조건적으로 포함시키기 위해 if 문을 사용할 수 있다:

let content;
if (isLoggedIn) {
  content = <AdminPanel />;
} else {
  content = <LoginForm />;
}
return (
  <div>
    {content}
  </div>
);


코드를 더 간결하게 작성하려면 삼항 연산자(conditional ? operator)를 사용할 수 있다. if 문과 달리 이 연산자는 JSX 내부에서도 작동한다:

<div>
  {isLoggedIn ? (
    <AdminPanel />
  ) : (
    <LoginForm />
  )}
</div>


else 가 필요하지 않은 경우, 더 간결한 논리 && 구문을 사용할 수도 있다:

<div>
  {isLoggedIn && <AdminPanel />}
</div>


이러한 모든 접근 방식은 속성을 조건적으로 지정하는 데도 동일하게 작동한다. JavaScript 구문 중 일부가 익숙하지 않다면 항상 if...else를 사용하여 시작할 수 있다.

📚 Rendering lists : 목록 렌더링

리스트 형태의 컴포넌트를 렌더링하기 위해 for 루프와 배열의 map() 함수와 같은 JavaScript 기능을 활용할 것이다.

예를 들어, 제품 목록 배열이 있다고 가정해보겠다:


const products = [
  { title: 'Cabbage', id: 1 },
  { title: 'Garlic', id: 2 },
  { title: 'Apple', id: 3 },
];


컴포넌트 내에서 map() 함수를 사용하여 제품 배열을 <li> 아이템의 배열로 변환하는 예:

const listItems = products.map(product =>
  <li key={product.id}>
    {product.title}
  </li>
);

return (
  <ul>{listItems}</ul>
);


<li>에는 key 속성이 있는 것을 주목한다. 리스트의 각 항목에 대해 해당 항목을 형제들 중에서 고유하게 식별하는 문자열 또는 숫자를 전달해야 한다. 일반적으로 키는 데이터에서 가져와야 한다. 예를 들어 데이터베이스 ID와 같은 값이 될 수 있다. React는 키를 사용하여 나중에 항목을 삽입, 삭제 또는 재정렬할 때 무엇이 발생했는지를 알게 된다.


// App.js

const products = [
  { title: 'Cabbage', isFruit: false, id: 1 },
  { title: 'Garlic', isFruit: false, id: 2 },
  { title: 'Apple', isFruit: true, id: 3 },
];

export default function ShoppingList() {
  const listItems = products.map(product =>
    <li
      key={product.id}
      style={{
        color: product.isFruit ? 'magenta' : 'darkgreen'
      }}
    >
      {product.title}
    </li>
  );

  return (
    <ul>{listItems}</ul>
  );
}

실행 결과

  • Cabbage
  • Garlic
  • Apple

📚 Responding to events : 이벤트 응답하기

이벤트에 응답하려면 컴포넌트 내에서 이벤트 핸들러 함수를 선언할 수 있다:

function MyButton() {
  function handleClick() {
    alert('You clicked me!');
  }

  return (
    <button onClick={handleClick}>
      Click me
    </button>
  );
}


onClick={handleClick}에서 괄호가 없음에 주목한다! 이벤트 핸들러 함수를 직접 호출하지 않고 함수를 전달만 하면 된다. 사용자가 버튼을 클릭할 때 React가 이벤트 핸들러를 호출한다.


📚 Updating the screen : 화면 업데이트

종종 컴포넌트가 특정 정보를 "기억"하고 표시하게 하고 싶을 때가 있다. 예를 들어, 버튼이 클릭된 횟수를 세고 싶을 수 있다. 이를 위해 컴포넌트에 상태를 추가하도록 한다.


우선, 'react' 라이브러리로 부터 useState를 추가하도록 한다.

import { useState } from 'react';


이제 아래와 같이 컴포넌트 내에서 상태 변수를 선언할 수 있다:

function MyButton() {
  const [count, setCount] = useState(0);
  // ...


`useState`를 통해 두 가지를 얻게 된다: 현재 상태(`count`)와 상태를 업데이트하는 함수(`setCount`)다. 어떤 이름으로도 지정할 수 있지만, 일반적으로 `[something, setSomething]` 형태로 작성하는 것이 관례다.

버튼이 처음 표시될 때 `count`는 0이 된다. 왜냐하면 `useState(0)`에 0을 전달했기 때문이다. 상태를 변경하려면 `setCount()`를 호출하고 새로운 값을 전달하면 된다. 이 버튼을 클릭하면 카운터가 증가한다.

function MyButton() {
  const [count, setCount] = useState(0);

  function handleClick() {
    setCount(count + 1);
  }

  return (
    <button onClick={handleClick}>
      Clicked {count} times
    </button>
  );
}


React는 컴포넌트 함수를 다시 호출한다. 이번에는 `count`가 1이 되고 2 계속해서 증가할 것이다.
동일한 컴포넌트를 여러 번 렌더링하는 경우, 각각이 고유한 상태를 가지게 된다. 각 버튼을 따로 클릭해 보자:


import { useState } from 'react';

export default function MyApp() {
  return (
    <div>
      <h1>Counters that update separately</h1>
      <MyButton />
      <MyButton />
    </div>
  );
}

function MyButton() {
  const [count, setCount] = useState(0);

  function handleClick() {
    setCount(count + 1);
  }

  return (
    <button onClick={handleClick}>
      Clicked {count} times
    </button>
  );
}

실행 결과


각 버튼이 자체적으로 상태를 "기억"하고 다른 버튼에 영향을 미치지 않는 것을 주목한다.

BoardList.jsx

import React from 'react';
import { boardList } from '../data/data';
import { Button, Table } from 'react-bootstrap';
import { Link } from 'react-router-dom';

const BoardList = () => {
    return (
        <div className='board-list'>
            <h1 className='my-5 text-center'>게시글 목록</h1>

            <Table striped bordered hover>
                <thead>
                    <tr>
                        <th>번호</th>
                        <th>제목</th>
                        <th>작성자</th>
                        <th>작성일</th>
                    </tr>
                </thead>

                <tbody>
                    {boardList.map(b => (
                        <tr key={b.id}>
                            <td>{b.id}</td>
                            <td>
                                <Link to = {{
                                    pathname : `/view/${b.id}`
                                }}>{b.title}</Link>
                            </td>
                            <td>{b.writer}</td>
                            <td>{b.reg_date}</td>
                        </tr>
                    ))}
                </tbody>
            </Table>
            <div className='text-end my-2'>
                <Link to={`/write`}>
                    <Button>작성하기</Button>
                </Link>
            </div>

        </div>
    );
};

export default BoardList;

BoardMain.jsx

import React from 'react';
import { BrowserRouter, Route, Routes } from 'react-router-dom';
import BoardList from './BoardList';
import BoardWrite from './BoardWrite';
import BoardView from './BoardView';
import BoardModify from './BoardModify';

const BoardMain = () => {
    return (
        <div className='board-main'>
            <BrowserRouter>
            
                <Routes>
                    <Route path="/"           element={<BoardList />}   />
                    <Route path="/write"      element={<BoardWrite />}  />
                    <Route path="/view/:id"   element={<BoardView />}   />
                    <Route path="/modify/:id" element={<BoardModify />} />
                </Routes>
            
            </BrowserRouter>
        </div>
    );
};

export default BoardMain;


BoardModify.jsx

import React from 'react';
import { useParams } from 'react-router-dom';
import { boardList } from '../data/data';
import { Row, Col, Form, Button } from 'react-bootstrap';

const BoardModify = () => {

    const { id } = useParams();
    const idx = boardList.findIndex(b => b.id === Number(id)); 
    const board = boardList[idx];


    return (
        <div className='board-modify'>
            <Form>
                <Row className='my-5'>
                    <Col className='p-5'>
                        <h1 className='text-center my-5'>{board.id}번 게시글 수정</h1>
                    
                        <Form.Label>제목</Form.Label>
                        <Form.Control className='my-3' name='title' placeholder={board.title} />

                        <Form.Label>작성자</Form.Label>
                        <Form.Control className='my-3' name='writer'placeholder={board.writer} />

                        <Form.Label>내용</Form.Label>
                        <Form.Control as='textarea' rows={10} className='my-3' name='contents' placeholder={board.contents} />

                        <div className='text-center'>
                            <Button className='mx-2 px-3 btn-sm'>수정</Button>
                            <Button className='mx-2 px-3 btn-sm' variant='secondary'>초기화</Button>
                        </div>                
                    </Col>
                </Row>
            </Form>
        </div>
    );
};

export default BoardModify;

BoardView.jsx

import React from 'react';
import { useParams, Link } from 'react-router-dom';
import { boardList } from '../data/data';
import { Button, Row, Col, Card } from 'react-bootstrap';

const BoardView = () => {

    const { id } = useParams();
    const idx = boardList.findIndex(b => b.id === Number(id));
    // 배열 boardList에서 특정 조건을 만족하는 요소의 인덱스를 찾는 JavaScript의 배열 메소드인 findIndex를 사용한 코드
    // b : 배열 각각의 요소
    // b.id : 배열의 현재 요소 'id'속성
    // Number(id) : 주어진 'id'를 숫자로 반환

    console.log(`id : ${id}`);
    console.log(`idx : ${idx}`);

    const board = boardList[idx];
    console.log(board);

    return (
        <div className='board-view'>
            <Row className='my-5'>
                <Col className='px-5'>
                    <h1 className='my-5 text-center'>{board.id}번 게시글 정보</h1>
                    
                    <div className='text-end my-2'>
                        <Link to = {{
                            pathname : `/modify/${id}`
                        }} >
                        <Button className='btn-sm mx-2'>수정</Button></Link>
                        <Button className='btn-sm' variant='danger'>삭제</Button>
                    </div>

                    <Card>
                        <Card.Body>
                            <h5>[{board.id}] {board.title}</h5>
                            <hr/>
                            <div className='cArea'>{board.contents}</div>
                        </Card.Body>

                        <Card.Footer>
                            Created on {board.reg_date} by {board.writer}
                        </Card.Footer>
                    </Card>
                </Col>
            </Row>
        </div>
    );
};

export default BoardView;


BoardWrite.jsx

import React from 'react';
import {Row, Col, Button, Form} from 'react-bootstrap';

const BoardWrite = () => {
    return (
        <div className='board-write'>
            <Form>
                <Row className='my-5'>
                    <Col className='p-5'>
                        <h1 className='text-center my-5'>게시글 작성</h1>
                    
                        <Form.Label>제목</Form.Label>
                        <Form.Control className='my-3' name='title' placeholder='제목을 입력하세요.' />

                        <Form.Label>작성자</Form.Label>
                        <Form.Control className='my-3' name='writer' placeholder='작성자를 입력하세요.' />

                        <Form.Label>내용</Form.Label>
                        <Form.Control as='textarea' rows={10} className='my-3' name='contents' placeholder='내용을 입력하세요.' />

                        <div className='text-center'>
                            <Button className='mx-2 px-3 btn-sm'>저장</Button>
                            <Button className='mx-2 px-3 btn-sm' variant='secondary'>초기화</Button>
                        </div>
                    </Col>
                </Row>
            </Form>
        </div>
    );
};

export default BoardWrite;

App.css

* {
    margin: 0;
    padding: 0;
}

ul {
    list-style-type: none;
}

a {
    text-decoration: none;
}

.App {
    padding: 10px;
    width: 1200px;
    height: 600px;
    background-color: lightskyblue;
    margin: 0 auto;
}


.cArea {
    height: 200px;
}

.board-list {
    width: 95%;
    margin: auto;
}

App.js

import './App.css';
import 'bootstrap/dist/css/bootstrap.min.css';
import BoardMain from './component/BoardMain';

function App() {
  return (
    <div className="App">
      <BoardMain />
    </div>
  );
}

export default App;

확장 : Reactjs code snippets 설치

* {
    margin: 0;
    text-align: center;
  }
  
  .header {
    background-color: lightpink;
    height: 50px;
    padding: 10px;
  }
  
  .header a {
    margin: 10px;
  }
  
  .comp a {
    margin: 10px;
  }
  
  .home, .comp{
    background-color: lightskyblue;
    height: 400px;
    padding: 10px;
  }
  
  
  .footer {
    background-color: lightseagreen;
    height: 100px;
    padding: 10px;
  }

  button, hr {
    margin: 10px;
  }
import './App.css';
import Home from './component/Home';
import Header from './component/Header';
import Footer from './component/Footer';
import { BrowserRouter, Routes, Route } from 'react-router-dom';
import Comp1 from './component/Comp1';
import Comp2 from './component/Comp2';
import Comp3 from './component/Comp3';
import Param1 from './component/Param1';
import Param2 from './component/Param2';

function App() {
  return (
    <div className="App">
      <BrowserRouter>
        <Header />      

        <Routes>
          <Route path="/" element={<Home />}/>
          <Route path="/comp1" element={<Comp1 />}/>
          <Route path="/comp2" element={<Comp2 />}/>
          <Route path="/comp3" element={<Comp3 />}/>
          <Route path="/param/:id" element={<Param1 />}/>
          <Route path="/param"     element={<Param2 />}/>
        </Routes>
           
      </BrowserRouter>
      <Footer />      
    </div>
  );
}

export default App;
import React from 'react';

const Start = () => {

    // 해당 영역에서는 이와 같이 주석을 사용할 수 있습니다.
    const name = "도깨비";

    // JSX(JavaScriptXML) : 코드 간결, 가독성 좋음
    // JSX를 사용하는 주요 이유 중 하나는 JavaScript 함수 내에서 HTML과 유사한 문법을 사용할 수 있게 함으로써, 
    // 사용자 인터페이스(UI)를 더 직관적이고 선언적으로 구성

    const style = {
        color : "white",
        backgroundColor : "black",
        fontSize : "48px",
        fontWeight : "bold",
        padding : "16px"
    }

    return (
        <div className='start'>
            <h2>이 곳은 Start.jsx 영역입니다.</h2>
            <h2>Start.jsx 내용이 출력됩니다.</h2>

            {/* 주석은 아래와 같이 작성합니다. */}
            {/* {React.createElement('h2', null, `${name}님 반갑습니다.`)} */}
            <h2 style={style}>{name}님 반갑습니다.</h2>
        </div>
    );
};

export default Start;


import { Link } from "react-router-dom";

const Header = () => {

    return (
        <div className="header">
            {/* <h2>Header.jsx</h2> */}
            {/* a태그의 href 대신 Link태그의 to 사용 */}

            <Link to="/">Home</Link>
            <Link to="/comp1">Comp1</Link>
            <Link to="/comp2">Comp2</Link>
            <Link to="/comp3">Comp3</Link>

        </div>
    );
}

export default Header;


import React from 'react';
import Logo from '../image/PenLogo.png';

const Home = () => {

    const style1 = { width:"400px" };
    

    return (
        <div className="home">
            <h2>Home.jsx</h2>
            <img src={Logo} style={style1} alt="로고"></img>
        </div>
    );
}

export default Home;


import React from 'react';

const Footer = () => {
    return (
        <div className='footer'>
            <h3>COPYRIGHT © 2024 BY ICIA ALL RIGHTS RESERVED.</h3>
            <h2>프로젝트 기반의 리액트 기초 보수교육</h2>
            <h4>한국기술교육대학교 능력개발교육원 & 인천일보아카데미</h4>
        </div>
    );
};

export default Footer;
<!DOCTYPE html>
<html lang="en">

<head>
    <meta charset="UTF-8">
    <meta name="viewport" content="width=device-width, initial-scale=1.0">
    <title>Document</title>
</head>

<body>

</body>

<script>
    // ES6 문법
    // ES란, ECMAScript의 약자이며 자바스크립트의 표준, 규격을 나타내는 용어

    // [1] let, const 키워드
    var num1 = 10;
    var num1 = 20;
    num1 = 30;

    let num2 = 40;
    // let num2 = 50;
    num2 = 60;

    const num3 = 70;
    // const num3 = 80;
    // num3= 90;

    console.log(num1, num2, num3);

    // [2] 템플릿 리터럴
    // 사용법은 ` ` (back tick)으로 가능하다.
    // { } 중괄호 앞에 달러 표시를 통해 자바스크립트 표현식 사용이 가능하다.
    // console.log('num1 : ' + num1 + ", num2 : " + num2 + ", num3 : " + num3);
    console.log(`num1 : ${num1}, num2 : ${num2}, num3 : ${num3}`);

    // [3] 화살표 함수
    let name = '황인철';

    function myFunc(name) {
        return `이름 : ${name}`;
    }

    const myFunc1 = (name) => {
        return `이름 : ${name}`;
    }

    const myFunc2 = (name) => `이름 : ${name}`;

    console.log(myFunc(name));  // 이름 : 황인철
    console.log(myFunc1(name)); // 이름 : 황인철
    console.log(myFunc2(name)); // 이름 : 황인철

    // [4] 구조 분해 할당
    const student = {
        name1: "황인철",
        age: 30,
        addr: "인천"
    }

    const { name1, age, addr } = student;
    console.log(`name1 : ${name1}, age : ${age}, addr : ${addr}`);

    // [5] Spread 연산자
    // Array
    const arr1 = [1, 2, 3, 4, 5];
    const arr2 = [...arr1, 6, 7, 8, 9];

    console.log(arr2); // [ 1, 2, 3, 4, 5, 6, 7, 8, 9 ]

    // String
    const str1 = 'icia react';
    const str2 = [...str1];
    console.log(str2); // [ "i", "c", "i", "a", " ", "r", "e", "a", "c", "t" ]

</script>

</html>
import React from 'react';
import { student, students } from '../data/data';
import Student from './Student';

const Comp1 = () => {
    return (
        <div className="comp1 comp">
            {/* <h2>Comp1.jsx</h2> */}
            {/* <p>이름 : {student.name}, 나이 : {student.age}, 주소 : {student.addr}</p> */}

            <Student stu={student}/>

            <hr />
            
            {/* Student 컴포넌트와 students 배열을 사용해서 출력하기 */}
            {students.map( students => (
                <Student stu = {students} />
            ))}

        </div>
    );
};

export default Comp1;


// Student.jsx 파일에서 rsc

const Student = (props) => {
    // props : (prop)ertie(s)
    // 부모(상위) 컴포넌트에서 자식(하위)컴포넌트로 파라미터를 전달
    // es6의 분해할당을 통해 props로 받은 object stu의 값을 각각 name, age, addr 변수에 할당
    const { name , age, addr } = props.stu;
    
    return (
        <div className="student">
            <p>이름 : {name} , 나이 : {age} , 주소 : {addr}</p>
        </div>
    );
};

export default Student;
import React, { useState } from 'react';

const Comp2 = () => {
    
    /*
        state : 일반 자바 객체로 component에서 변할 수 있는 값

        lifecycle(생명주기)

        마운트 : 컴포넌트가 생성되고 브라우저에 출력될 때
        constructor : 컴포넌트가 새로 만들어 질 때마다 호출 되는 클래스 생성자 메소드
        render : 랜더링 메소드
        componentDidMount : 처음 랜더링 될 때 호출

        업데이트 : props나 state가 바뀔 때 부모컴포넌트가 재랜더링 될때
        shouldComponentUpdate : props나 state가 변경됐을 때 재랜더링을 할지 결정하는 메소드
        render : 재랜더링 
        componentDidUpdate : 컴포넌트의 업데이트 작업이 끝난 후 호출 

        언마운트 : 마운트의 반대, 컴포넌트가 제거 될 때
        componentWillUnmount : 컴포넌트가 브라우저에서 사라지기 전에 호출하는 메소드

        hooks : 함수형 컴포넌트에서 리액트의 state와
        생명주기 기능을 연동(hook) 할 수 있게 해주는 함수

        useState()
        const [ 변수명, 함수명 ] = useState(초기값);
    */
    
    // 버튼을 눌렀을 때 state값이 변하도록
    const [param1 , setParam1] = useState("초기값");

    const changeParam1 = () => {
        setParam1("안녕하세요");
    }

    // 버튼을 눌렀을 때 count가 증가 혹은 감소하도록
    const [count, setCount] = useState(100);

    const onIncrease = () => {
        setCount(count + 1);
    }

    const onDecrease = () => {
        setCount(count - 1);
    }

    // 값을 입력했을 경우 입력한 값이 출력되도록
    const [param2 , setParam2] = useState("");

    const textInput = (e) => {
        console.log(e.target.value);
        console.log(e.target.name);

        const { name, value } = e.target;
        console.log(`name : ${name}, value : ${value}`);

        setParam2(value);

    }

    // 버튼을 클릭했을 경우 컬러가 바뀌도록
    const [color, setColor] = useState("red");
    
    return (
        <div className='comp2 comp'>
            <p>{param1}</p>
            <button onClick={changeParam1}>버튼</button>
            <br /><hr />

            <p>count : {count}</p>
            <button onClick={onIncrease}>증가</button>
            <button onClick={onDecrease}>감소</button>
            <br /><hr />

            <p>입력값 : {param2}</p>
            <input type="text" name="param2" onChange={textInput}/>
            <br /><hr />

            <p style={{background:color, color:"white", fontSize : "30px"}}>안녕하세요.</p>
            <button onClick={()=>setColor("red")}>빨강</button>
            <button onClick={()=>setColor("blue")}>파랑</button>
            <button onClick={()=>setColor("green")}>초록</button>


        </div>
    );
};

export default Comp2;


import React, { useState } from 'react';
import { Link } from "react-router-dom";
import { students } from '../data/data';


const Comp3 = () => {

    const [id , setId] = useState();
    const [page , setPage] = useState();


    // path variable : "/param/12"
    // queryString : "/param?id=6&page=2"

    /*
        <input type="text" name="id" onChange={(e)=>{setId(e.target.value)}} placeholder="id입력"/><br/>
        <input type="text" name="page" onChange={(e)=>{setPage(e.target.value)}} placeholder="page입력"/><br/>
        <Link to={{
            pathname : "/param",
            search : `?id=${id}&page=${page}`
        }}>버튼</Link>
    */

    return (
        <div className="comp3 comp">
            <Link to={
                { pathname : "/param/20" }
            }>
                path variable
            </Link>

            <hr />

            {students.map(s => (
                <Link to={
                    {
                        pathname : `/param/${s.name}`
                    }
                }>{s.name}</Link>
            ))}

            <hr />

            <Link to="/param?id=6&page=2">param전송</Link>
            <Link to={{
                pathname : "/param",
                search : "?id=6&page=20&name=icia"
            }}>param전송(query String)</Link>

            {/* id값을 입력 */}
            {/* page값을 입력 */}
            {/* 버튼 클릭 => Param2 : id값 page값 전송 */}

            <hr />

            <input type="text" name="id" onChange={(e)=>{setId(e.target.value)}} placeholder="id입력"/><br/>
            <input type="text" name="page" onChange={(e)=>{setPage(e.target.value)}} placeholder="page입력"/><br/>
            <Link to={{
                pathname : "/param",
                search : `?id=${id}&page=${page}`
            }}>입력</Link>
        </div>
    );
}

export default Comp3;


import React from 'react';
import { useParams } from 'react-router-dom';


const Param1 = () => {

    const { id } = useParams();

    return (
        <div className='param1 comp'>
            <h2>요청 id : {id}</h2>
        </div>
    );
};

export default Param1;


import React from 'react';
import { useSearchParams } from 'react-router-dom';

const Param2 = () => {

    // /param?id=6&page=2
    const [params] = useSearchParams();
    console.log(params.size);

    const search = [...params];
    console.log(search);

    return (
        <div className='param2 comp'>
            {search.map(s => (
                <p>{s[0]} : {s[1]}</p>
            ))}
        </div>
    );
};

export default Param2;

리액트(React)에서 props는 부모 컴포넌트에서 자식 컴포넌트로 데이터를 전달하는 데 사용되는 속성입니다. 이것은 부모 컴포넌트가 자식 컴포넌트에게 데이터나 함수를 전달하여 상호작용하거나 구성하는 데에 사용됩니다. props는 부모 컴포넌트에서 자식 컴포넌트로 단방향으로 전달되며, 자식 컴포넌트에서는 이를 읽기 전용으로 사용합니다.

간단한 props의 사용 예시를 보여드리겠습니다:

  1. 부모 컴포넌트에서 자식 컴포넌트로 문자열 전달하기:
  2.  
// ParentComponent.js
import React from 'react';
import ChildComponent from './ChildComponent';

const ParentComponent = () => {
  const message = '안녕하세요!';

  return (
    <div>
      <ChildComponent message={message} />
    </div>
  );
};

// ChildComponent.js
import React from 'react';

const ChildComponent = (props) => {
  return (
    <div>
      <p>{props.message}</p>
    </div>
  );
};

export default ChildComponent;


여기서 ParentComponent에서 ChildComponent로 message라는 문자열을 전달하고 있습니다. 자식 컴포넌트에서는 props.message를 통해 전달받은 값을 사용하여 화면에 출력하고 있습니다.

  1. 부모 컴포넌트에서 자식 컴포넌트로 함수 전달하기:
// ParentComponent.js
import React from 'react';
import ChildComponent from './ChildComponent';

const ParentComponent = () => {
  const handleButtonClick = () => {
    alert('버튼이 클릭되었습니다!');
  };

  return (
    <div>
      <ChildComponent onClick={handleButtonClick} />
    </div>
  );
};

// ChildComponent.js
import React from 'react';

const ChildComponent = (props) => {
  return (
    <div>
      <button onClick={props.onClick}>클릭하세요</button>
    </div>
  );
};

export default ChildComponent;


이 예시에서는 부모 컴포넌트에서 자식 컴포넌트로 handleButtonClick이라는 함수를 전달하고 있습니다. 자식 컴포넌트에서는 전달받은 함수를 이벤트 핸들러로 사용하여 버튼 클릭 시에 얼럿을 띄우고 있습니다.


Props의 개념

propsprop 뒤에 복수형을 나타내는 s를 붙여서 prop이 여러 개인 것을 의미한다. prop

property를 줄여서 쓴 것으로 속성이나 특성을 나타낸다. 여기서 속성은 리액트 컴포넌트의 속성이다.

앞서 컴포넌트는 붕어빵 틀에 비유하고 엘리먼트는 완성된 붕어빵으로 설명을 했다. 그렇다면 props

어떤 것일까? props는 붕어빵에 들어가는 재료라고 생각하면 된다. 팥을 넣으면 팥붕어빵, 슈크림을

넣으면 슈크림 붕어빵, 고구마를 넣으면 고구마 붕어빵이 되는 것처럼 같은 컴포넌트에서 props에 따라

엘리먼트의 결과가 달라지는 것을 확인할 수 있다.


Props 사용법

props는 컴포넌트에 전달할 다양한 정보를 담고 있는 자바스크립트 객체다. 컴포넌트에 props라는

객체를 전달하기 위해 어떻게 해야 하는지 살펴보도록 한다. 먼저 JSX를 사용하는 경우에는 아래 코드와

같이 키(key)와 값(value)로 이루어진 킷값 쌍의 형태로 컴포넌트에 props를 넣을 수 있다.

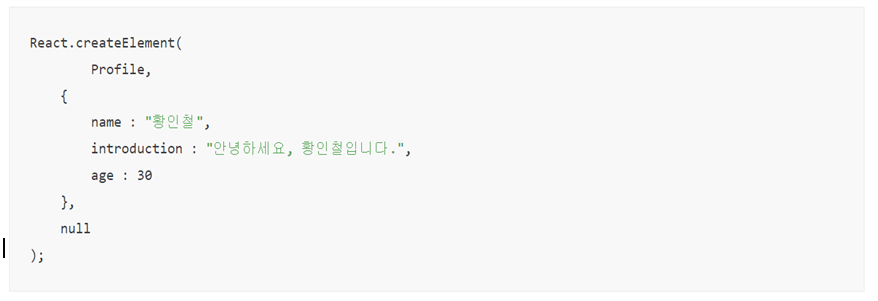
이 코드에 App 컴포넌트가 나오고, 그 안에 Profile 컴포넌트를 사용하고 있다. 여기서 Profile 컴포넌트에  name, introduction, age라는 세 가지 속성을 넣어주었다. 이렇게 하면 이 속성의 값이 모두 Profile  컴포넌트에 props로 전달되며 props는 아래와 같은 형태의 자바스크립트 객체가 된다.

nameintroduction에 들어간 문자열은 중괄호를 ㅈ사용하지 않았고, age에 들어간 정수는 중괄호를 사용했다. 중괄호를 사용하면 무조건 자바스크립트 코드가 들어간다고 배웠다. 마찬가지로 props 값을 넣을 때에도 문자열 외에 정수, 변수, 다른 컴포넌트 등이 들어갈 경우 중괄호로 감싸주어야 한다. JSX를 사용하지 않을 경우는 createElement() 함수를 사용해서 아래와 같이 작성한다.


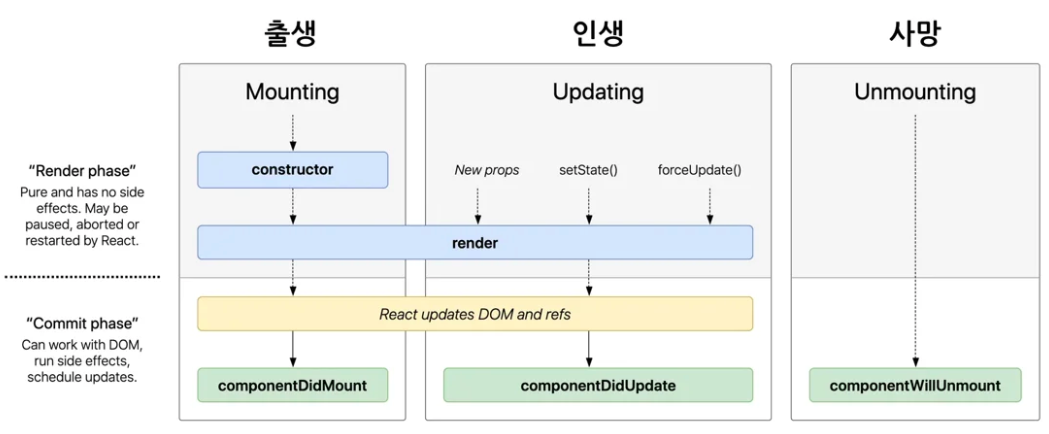
리액트의 컴포넌트 생명주기(Lifecycle)는 컴포넌트가 생성되고 파괴될 때까지의 여러 단계를 설명합니다. 이러한 생명주기는 주로 클래스 기반 컴포넌트에서 중요한 역할을 합니다. 각 단계는 특정 시점에서 호출되는 메서드(생명주기 메서드)로 구성되어 있습니다. 여기에는 주로 다음과 같은 단계가 있습니다:

1. 마운팅(Mounting)
컴포넌트가 DOM에 삽입되는 단계입니다.

- constructor()
  - 컴포넌트가 생성될 때 가장 먼저 실행됩니다.
  - 초기 상태를 설정하거나 메서드를 바인딩하는 데 사용됩니다.
-  static getDerivedStateFromProps(props, state)
  - 컴포넌트가 생성될 때와 컴포넌트가 새로운 props를 받을 때 호출됩니다.
  - 상태를 props에 따라 업데이트하는 데 사용됩니다.
-  render()
  - 컴포넌트의 UI를 렌더링하는 메서드입니다.
  - 순수 함수로서, this.props와 this.state에 접근할 수 있지만, 이를 변경하면 안 됩니다.
-  componentDidMount()
  - 컴포넌트가 마운트된 직후, 즉 DOM 트리에 삽입된 후에 호출됩니다.
  - 네트워크 요청이나 DOM에 직접적인 접근 등의 작업을 수행하는 데 적합합니다.

2. 업데이트(Updating)
props 또는 state의 변경으로 컴포넌트가 업데이트되는 단계입니다.

-  static getDerivedStateFromProps(props, state)
  - 컴포넌트가 새로운 props를 받을 때 호출됩니다.
-  shouldComponentUpdate(nextProps, nextState)
  - 컴포넌트가 리렌더링 여부를 결정할 때 호출됩니다.
  - 성능 최적화에 유용합니다. 기본적으로 항상 true를 반환합니다.
-  render()
  - 컴포넌트를 리렌더링합니다.
-  getSnapshotBeforeUpdate(prevProps, prevState)
  - 실제 DOM 변경이 일어나기 직전에 호출됩니다.
  - DOM의 현재 상태(예: 스크롤 위치)를 캡처하는 데 사용될 수 있습니다.
-  componentDidUpdate(prevProps, prevState, snapshot)
  - 업데이트가 발생하고 나서 DOM에 변경이 반영된 후에 호출됩니다.
  - 이전 props와 state를 이용하여 특정 작업을 수행할 수 있습니다.

3. 언마운팅(Unmounting)
컴포넌트가 DOM에서 제거되는 단계입니다.

-  componentWillUnmount()
  - 컴포넌트가 언마운트되고 파괴되기 전에 호출됩니다.
  - 타이머 제거, 네트워크 요청 취소, 컴포넌트에 의해 생성된 구독 해제 등의 정리 작업을 수행합니다.


리액트의 훅(Hooks)은 함수형 컴포넌트에서 상태 관리와 리액트의 다른 기능들을 "훅"하는 데 사용됩니다. 클래스 기반 컴포넌트에서만 가능했던 상태 관리, 라이프사이클 메소드 등의 기능을 함수형 컴포넌트에서도 사용할 수 있게 해 줍니다. 여기 대표적인 훅들과 그들의 용도를 설명하겠습니다:

1. useState

  • 용도: 컴포넌트의 상태 관리.
  • 사용법: [state, setState] = useState(initialState) 형태로 사용됩니다.
  • 예시: const [count, setCount] = useState(0) - count는 상태 변수, setCount는 이 변수를 업데이트하는 함수입니다.

2. useEffect

  • 용도: 사이드 이펙트(side effects)를 수행합니다 (데이터 fetching, subscriptions, 수동 DOM 조작 등).
  • 사용법: useEffect(() => { ... }, [dependencies]) 형태로 사용됩니다.
  • 예시: 컴포넌트가 마운트될 때와 특정 값이 변경될 때 작업을 수행합니다.

3. useContext

  • 용도: 컨텍스트(Context)의 값을 읽기 위해 사용됩니다.
  • 사용법: const value = useContext(MyContext) 형태로 사용됩니다.
  • 예시: 컨텍스트에 저장된 현재 테마 값이나 사용자 정보를 읽을 수 있습니다.

4. useReducer

  • 용도: useState보다 복잡한 상태 로직을 관리할 때 사용됩니다.
  • 사용법: [state, dispatch] = useReducer(reducer, initialState) 형태로 사용됩니다.
  • 예시: 상태 업데이트 로직을 컴포넌트 바깥에 작성하여 복잡한 컴포넌트를 더 관리하기 쉽게 만들 수 있습니다.

5. useCallback

  • 용도: 렌더링 성능을 최적화하기 위해 사용됩니다. 주로 자식 컴포넌트에 props로 전달되는 함수를 메모이제이션합니다.
  • 사용법: const memoizedCallback = useCallback(() => { ... }, [dependencies]) 형태로 사용됩니다.

6. useMemo

  • 용도: 렌더링 성능을 최적화하기 위해 사용됩니다. 값의 메모이제이션에 사용됩니다.
  • 사용법: const memoizedValue = useMemo(() => computeExpensiveValue(a, b), [a, b]) 형태로 사용됩니다.

7. useRef

  • 용도: ref를 생성합니다. DOM에 직접 접근할 때, 또는 렌더링 간에 데이터를 유지할 때 사용됩니다.
  • 사용법: const myRef = useRef(initialValue) 형태로 사용됩니다.

8. useLayoutEffect

  • 용도: DOM 변경 후, 화면에 그 변화가 반영되기 바로 전에 동기적으로 코드를 실행할 때 사용됩니다.
  • 사용법: useEffect와 동일하지만, 타이밍이 다릅니다.

9. useImperativeHandle

  • 용도: 자식 컴포넌트에서 부모 컴포넌트에 ref를 노출할 때 사용합니다.
  • 사용법: useImperativeHandle(ref, () => ({ ... }), [dependencies]) 형태로 사용됩니다.

훅은 함수형 컴포넌트를 더 강력하고 유연하게 만들어 주며, 리액트 개발에서 중요한 역할을 합니다. 훅을 사용함으로써 클래스 기반 컴포넌트의 복잡성을 피하고, 더 간결하고 읽기 쉬운 코드를 작성할 수 있습니다.


[0] 개발환경
 - nodejs 설치
 - VSCode 설치

[1] React 프로젝트 생성
 - npx create-react-app 'react-basic'

 - 안될 경우 
 - npm uninstall -g create-react-app
 - npm install -g create-react-app
 - npx create-react-app 'react-basic'

[2] 프로젝트 실행
 - npm start
 - localhost:3000
 - public/index.html의 (id="root")는
 - src/index.js의 document.getElementById('root')에 렌더링 한다. 
 - src/index.js의 <App />은 
 - src/App.js의 function App(){} (App 컴포넌트)의 return안에 있는 내용을 가져와서 출력한다.

[3] 프로젝트 구성 설명
 - node_modules : 라이브러리 폴더
 - public폴더
   └ index.html이 메인페이지 (App.js → index.js → index.html)
   └ static파일 보관함
 - src폴더 : 소스코드 보관함
 - package.json : 설치한 라이브러리 목록

[4] 컴포넌트 설명
 - 리액트(React) 컴포넌트는 React 애플리케이션을 구성하는 기본 단위(UI의 한부분)
 - 독립적이고 재사용 가능한 코드 블록
 - 자체적인 구조, 스타일, 동작
 - 큰 UI를 관리하기 쉬운 작은 단위로 분할하여, 애플리케이션의 코드를 더 효율적으로 관리하고 재사용

 - 클래스형과 함수형 컴포넌트가 있지만 최근에는 함수형을 사용한다.
 - 함수형 컴포넌트 snippet : "rsc" 자동완성

[5] 컴포넌트 활용 알아보기
  (1) App.js

import './App.css';
import Strat from './component/Start';


function App() {

  return (
    <div className="App">
      <Strat />
    </div>
  );
}

export default App;


  (2) Start.jsx

import React from 'react';

const Start = () => {

    // 해당 영역에서는 이와 같이 주석을 사용할 수 있습니다.
    const name = "도깨비";

    // JSX(JavaScriptXML) : 코드 간결, 가독성 좋음
    // JSX를 사용하는 주요 이유 중 하나는 JavaScript 함수 내에서 HTML과 유사한 문법을 사용할 수 있게 함으로써, 
    // 사용자 인터페이스(UI)를 더 직관적이고 선언적으로 구성

    const style = {
        color : "white",
        backgroundColor : "black",
        fontSize : "48px",
        fontWeight : "bold",
        padding : "16px"
    }

    return (
        <div className='start'>
            <h2>이 곳은 Start.jsx 영역입니다.</h2>
            <h2>Start.jsx 내용이 출력됩니다.</h2>

            {/* 주석은 아래와 같이 작성합니다. */}
            {/* {React.createElement('h2', null, `${name}님 반갑습니다.`)} */}
            <h2 style={style}>{name}님 반갑습니다.</h2>
        </div>
    );
};

export default Start;


[6] 리액트 레이아웃 + css 적용하기

import './App.css';
import Header from './component/Header';
import Home from './component/Home';
import Footer from './component/Footer';

function App() {

  return (
    <div className="App">
      <Header/>
      <Home/>
      <Footer/>
    </div>
  );
}

export default App;


import React from 'react';

const Header = () => {
    return (
        <div className='header'>
            Header.jsx
        </div>
    );
};

export default Header;
import React from 'react';

const Home = () => {
    return (
        <div className='home'>
            Home.jsx
        </div>
    );
};

export default Home;
import React from 'react';

const Header = () => {
    return (
        <div className='header'>
            Header.jsx
        </div>
    );
};

export default Header;
import React from 'react';

const Footer = () => {
    return (
        <div className='footer'>
            <h3>COPYRIGHT © 2024 BY ICIA ALL RIGHTS RESERVED.</h3>
            <h2>프로젝트 기반의 리액트 기초 보수교육</h2>
            <h4>한국기술교육대학교 능력개발교육원 & 인천일보아카데미</h4>
        </div>
    );
};

export default Footer;
* {
    margin: 0;
    text-align: center;
}

.header {
    background-color: lightpink;
    height: 100px;
}

.home {
    background-color: lightblue;
    height: 400px;
}

.footer {
    background-color: lightgreen;
    height: 150px;
}

'React' 카테고리의 다른 글

[React] Props에 대한 설명과 예시  (0) 2024.01.19
[React] Component 생명주기(LifeCycle)와 Hooks  (0) 2024.01.18
[React] JSX사용법  (0) 2024.01.17
[React] 리액트 준비하기  (0) 2024.01.17
[React] 리액트 첫시간  (0) 2024.01.16

+ Recent posts